

Why overcomplicate things with many different steps to growing your mushrooms? That’s why we are offering inject & forget all in 1 mushroom grow bags. It has never been easier to grow mushrooms, literally inject your spores
Finally. A mushroom Growing Kit that will work every time.
They said it was NOT possible! They were wrong!
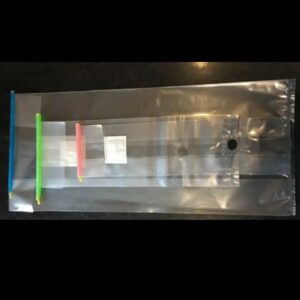
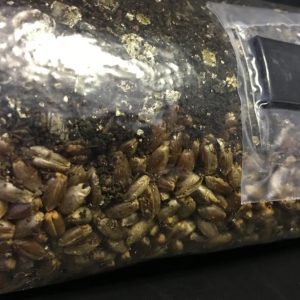
This mushroom growing kit is super easy to use. The special Mushroom substrate is held in a extra large all in one mushroom growing bag. The bag allows your spores to germinate in the substrate and the resulting mycelium to fruit all inside the same bag. Gas exchange is taken care of by an extra large filter patch and the self healing injection port allows the spores to be injected into the substrate with ease. It is a continuation of our world famous Inject-and-Forget mushroom growing kits. A automatic Mushroom Growing kit from us to you.
Have you been having trouble growing your mushrooms? Do you find all the fanning and misting a hassle? Fear no longer with this all in 1 mushroom grow bag!
WHAT YOU WILL NEED:
You will need a 10ml syringe for the 2lbs bag similar to the spore syringes we sell.
A heat mat with thermostat or heated propagator, like the one we sell which is able to fit 8x 1Lb Inject-and-Forget Bags work best with this product.
You will need a dim light source around 4500k-6500k. Standard room lighting and indirect sunlight also works perfectly.
You will need a spore syringe or syringe of gourmet liquid culture.
You will need a Easy Glide Bag Sealer as the bags are capable of many flushes and the bag sealer with do just as its name says between flushes/harvests.
Things not to do!!!!
1 The needle is sterile from the packet. do not wipe it or heat it. just connect and go.
2 If the syringe seems blocked, do not remove it from the injection port. Just pull the needle back a tiny bit and press harder on the plunger.
3 Do not open the bag until you want to harvest. The bag is a sealed unit and keeps contamination out and moisture in.
HOW TO USE THIS MUSHROOM GROWING KIT;
1: Connecting your syringe to your needle.
Open the end of the needle packet and then unscrew the black syringe lock tip from the syringe and screw the needle in its place. Leave the protective needle cap on the needle until you are ready to use.
2. Injecting your spores into the bag.
Do not wipe or heat sterilise the needle for this mushroom growing kit
Wipe down your injection port with the included alcohol swab.
Remove the protective needle cap and push the needle into the black injection port on the bag. Push on the plunger to inject the solution into the bag. Remove needle and replace needle cap.
Take time to massage the substrate and break up any clumps, spreading the spore solution evenly throughout the bag. Do not open the bag. But do spend 5 minutes on this part..
Why?
If you can massage the bag so as to have at least on spore per square centimetre of substrate you will have a fully colonized bag after 14 days. If you don’t evenly distribute the spores you will have a section with no life and this will delay your project and need a secondary shake up to aid colonisation.
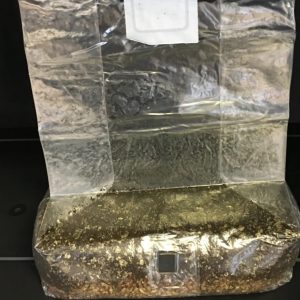
When the substrate is all mixed up, lay the bag on its side and shake the bag to evenly level the substrate. The bag should now look like an elongated tent with the substrate evenly distributed in the bottom just like in the pictures above. Do not compress the substrate. The substrate should be all broken up and airy.
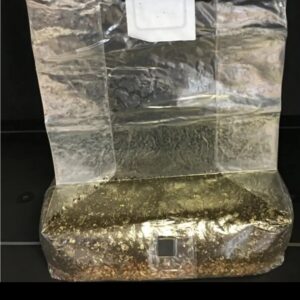
Now mushrooms love to side pin and most pins will appear on the side walls of the colonised substrate. For this reason, making the substrate into a ‘loaf’ shape with taller sides and a thinner top will promote the heaviest harvest.
3. How to colonise the substrate.
First tape your silver temperature probe of the thermostat to the heat mat. You do not want it to fall off. Now place the bag or one of your bags on top of the temperature probe on the heat mat or propagator and check temperature is set to 26-27C via the thermostat. Heat mats purchased from our store will be Pre-set at 26-27c. Our systems are always plug and play meaning plug the heat mat in and it will maintain the perfect conditions for you day and night, so now you can sit back and relax.
To help the bags work, you can house your heat mat and Inject-and-Forget bag in a small storage box if you want; simply drill 4x 8mm holes on each side of the box for air flow, make 2 holes down low on each side close to the base of the tub and two holes on each side up high close to the lid of the tub.
This will make you a little incubator, helping to maintain a nice warm environment around your bag. The holes you have drilled will allow the box to breath, bringing fresh air flow past your bags air filter.
Do not enclose the Inject-and-Forget bag in a sealed box, the bag must be able to expel moisture and gases via the Air filter. Evaporation inside the bag will depend on the filter patch being able to breath; the reason why the propagators with lids work so well is they have a nice flow of warm air (and therefore slightly drier air) to help the bags breath.
Keep the bag in the dark until it is fully colonised and ready to fruit.
Keep the bag in the dark until it is fully colonised and ready to fruit.
Keep the bag in the dark until it is fully colonised and ready to fruit.
Keep the bag in the dark until it is fully colonised and ready to fruit.
Chill and wait for life to appear, do not handle the bags as the mycelium is trying to do its job and is very delicate at all stages.
Very soon the mixed-up substrate will be fully colonised and you`re ready to start the fruiting process.
If you did not mix the spores into all the substrate well enough, you may have some barren areas. Most of the time these areas will be colonised by the mycelium. It is common for a small patch of substrate to remain uncolonised by the filter patch. This shows that the evaporation and breathing process of the Inject-and-Forget system is working well. If you have barren areas at 3-4 weeks after injection. You can break all the substrate up again and remix. Full colonisation should be complete 5 days after.
If massage, temperatures and conditions are correct, full colonisation of the substrate can be as quick as two weeks meaning the bag has turned all white and is ready to fruit. If the bags are kept too warm, too cold or can’t breathe properly, full colonisation of the bag may take up to 5-6 weeks or longer, so maintaining the correct environment is IMPORTANT!
If you do drop the bag or need to break up the substrate at this time you may delay the fruiting process…. Keep calm and carry on. There is nothing you can do, but life will still prevail.
4: How to fruit
Now you are ready to fruit! To start the fruiting process, turn on your lights, 12/24 works great and keep maintaining the temperature at 26-27C.
Make sure the light source is not to bright for the life inside the Mushroom Growing bag. Low light works great bright light does not. Plants light bright light and mushroom light dim light.
After 10-20 days in the correct environment you will see the pins forming along the sides of the cake. These tiny dots are the mushroom pins that will grow into nice big juicy mushrooms.
5. Sit back and just watch them grow!
Different strains will take different times, so please be patient. The life form that you are caring for will be able to do its job with the correct conditions and the correct amount of time. Try not to handle the bags and do place the bags in a heated propagator or on a heat mat in a nice warm room. Being warm and cosy is exactly what the mycelium wants.
The mushrooms will turn from the small pins into identifiable mushrooms. If you have one or two mushrooms that have started early, wait until those mushrooms are mature then cut the end of the bag open to remove them. Close the bag back up using a Easy-Glide Bag Sealer and allow the other mushrooms to mature.
If the bags have been kept too cool, the mushrooms will be short adapting to the lower temps. If the bags have been kept with both base and ambient temperature at 26-27 C, the mushrooms can grow huge with 10inch long stems!
When the majority of the mushrooms are mature (or the bag is full) please cut open one end of the bag. Peel the mushroom clusters away from the substrate including any under developed mushrooms.
Harvest before any spores (Black soot) fall out of the mushroom caps. If this happens, Keep calm and carry on.
Wash your hands and always keep the Mushroom Substrate loaf inside the bag at all times to reduce chances of contamination.
6. How to get more flushes
If you want to get another flush after harvesting the mushrooms. Turn on the cold tap in the kitchen and add enough water to the bag so the mushroom substrate loaf sits in 1 inch of water. The trace amount of chlorine in the tap water helps cleanse the loaf while it soaks. Seal the bag up and leave for 12 hours, then drain for 30 mins at an angle. Close the grow bag with an Easy-Glide Bag Sealer and place back in fruiting conditions. It will take a similar amount of time for subsequent flushes to show.
The brown rice flour substrate mix has oxygen release agents that will slowly release oxygen for your mushrooms during growth. The agents work by time release; meaning they will not hamper germination or colonisation… only releasing when needed. The oxygen release rate will increase during fruiting and so will actively push out any CO2 generated as the mushrooms grow.
Temperature and timing are important with this system, that’s why we strongly recommend the use of a temperature controlled heat mat. Colder temps will lead to reduced yield and longer waiting times!
With temperatures of between 26-27C, you can expect a completely NO FUSS FIRST FLUSH YIELD OF BETWEEN 200-400g of fresh mushrooms. The average first flush yield during product testing was a healthy 297g.
Images provided for informational and educational reference only and originate from cultivators and labs outside the UK. Cultivation of this species is illegal in many countries including the United Kingdom. Please check your local regulations.
Related products
-
-
Grow Kits
4lb 50/50 Injectable Horse Manure And Rye Grain Mushroom growing kit
Original price was: £39.99.£35.99Current price is: £35.99. Including VAT: £43.19 -
Spawn & Substrate
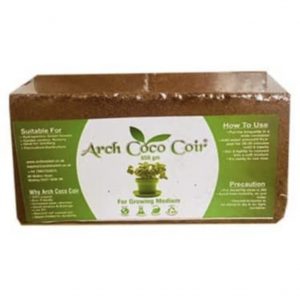
Coco Coir Brick
£6.99 Including VAT: £8.39Coco Coir brick which is ideal for pasteurising to use as mushroom growing substrate. Each brick is approx 650 grams.
-
Grow Kits
4lb 50/50 Injectable Horse Manure And Rye Grain Mushroom Growing Kit
Original price was: £39.99.£35.99Current price is: £35.99. Including VAT: £43.19 -
Grow Kits
Small Easy Glide Bag Sealer (Perfect for 1lb Inject & Forget Bags)
£0.99 Including VAT: £1.19 -


Reviews
There are no reviews yet.